Thursday, November 17, 2011

ZAYCON BEEF EVENT!!!!

Hey guys!!! 

HAD to post about the beef event.

So, I did this event the last time they offered and OH MY GOODNESS how amazing the beef was!!!  I am going to summarize below with the pictures I took from this event I just participated in today!  Keep this bookmarked cause it comes around a few times a year!!  I will let everyone know when it comes around again!

This beef is 93/7 for $2.79/lb.  Here is the description right from Zaycon's website (https://www.zayconfoods.com/refer/zf10027):

A 40 lb case containing 4 tubes of Fine Grind super lean beef (93/7). Not all cases are exactly 40 lbs. If, upon delivery, your case is not 40 lbs, you will receive a credit to your Zaycon account.

This event actually came right HERE to Maricopa, so all my Maricopa peeps, we don't have to drive in to town to get our beef.  All my other AZ friends, there are MANY locations to choose from across the valley, find the one closest to you! :)

The website is:  https://www.zayconfoods.com/refer/zf10027

Pick up is so incredibly SIMPLE!  You don't even get out of your car.  Basically, you print the receipt for your order, take it with you to the pick up location, drive up to the location, they have signs that say "enter," follow that and it will pull you up to the side of a refrigerated semi.  They'll ask for your name, they'll verify how many boxes you ordered, and then ask you where you want them.  You just stay in your car and they throw the boxes in your car FOR YOU!  Then you drive away!  THAT"S IT!  So all the mom's that dread doing something like this cause they'll have to drag their kids along, NO SWEAT!  Super easy!

Here are a few pictures below:

 This is the box they load right into your car.

 This is what it looks like inside your box! :)

 This is how I divide mine! :)  Each bag 1# each.

Here is one complete box.  I finished off with 39 bags!

Monday, November 14, 2011

FUNDRAISER: Kate's Crazy Cool Christmas

Hey fellow blog readers!!!!

God has laid something HUGE on my heart and I'm taking action!!!!

A dear friend of mine's daughter that I went to school with back in Iowa, is fighting a very long and exhausting fight to brain cancer.  I have shared their blog address many times (http://www.caringbridge.org/visit/mcraekate), so many of you have already heard and read about her, anyways, for a few years now they have done an incredible Christmas event for the Phoenix area by doing something called Kate's Crazy Cool Christmas!  Each year, by donations alone, they provide many of the families' who have little ones battling cancer with a load of Christmas gifts to bring them some cheer!  Many of these families aren't even home for Christmas, but instead in the hospital celebrating with a sick one!  I don't know about you, but just thinking of this puts me in my place!  I can't even BEGIN to imagine going through something like this, but in spite of all the sadness, Kate's family has organized this great event to bring so happiness to some hurting families! 
So, in hopes to check off some needed items requested on their list, I am going to offer two kinds of bread and donating ALL PROCEEDS to this event!!!!  I am offering my Oatmeal Bread (5 mini loaves) for $10 or I'm also offering my Crescent Rolls (16/batch) for $10.  To make it easier, I'm only selling in batches.  These will be on a 'made to order' basis, so please e-mail me to place an order at bbaltzly@gmail.com.  These breads freeze VERY WELL for up to 3 months or so!  These are also great for the Holiday gatherings and parties coming up!  This is an ASKING donation of $10/each, if you'd like to give more, I will just add and purchase more of the items on the list!!  THANKS SO MUCH FOR YOUR SUPPORT IN THIS!!!!!  God bless!

UPDATE on 11/15:  A few Iowa friends have asked how they can get in on this!  So, I went to post office today and here's what I found!  I am more than happy to ship you some bread to Iowa!  Unfortunately since I am donating all the ingredients I can't cover shipping! :(  But if you want to order, I found the cheapest for fastest delivery is 2-3 day priority for $10.95.  For this size box, ordering two batches would be more worth your dollar! :)  I'd make it an even $30 for two batches shipped!  :) 

$10 for 5 mini loaves of Oatmeal Bread

$10 for 16 Crescent Rolls

Monday, November 7, 2011

Strawberry Lemonade

One of my favorite drinks to order at restaraunts are Strawberry Lemonades!  The fresh kind, not the "fountain" kind.  Not many restaruants offer it but every time I get to order it, I LOVE IT!  It's pretty easy to make it for yourself at home! 


2 - 12 oz lemonade concentrate, thawed
1 c sugar
20 ounces frozen strawberries, thawed
9 c water

In a blender, puree sugar, strawberries and 4 c water.  Leave somewhat chunky.  In a large pitcher combine lemonade concentrate, 5 c water and strawberry puree mixture all together and stir.  Serve over a full glass of ice!

Wednesday, October 5, 2011

Zaycon Chicken

REPOST:  October 5, 2011

 I am here to tell you this is an AMAZING price for chicken and WELL WORTH ordering a case before they are SOLD OUT!  GO NOW to this link:  http://www.zayconfoods.com/refer/zf10027, SIGN UP and order!!!  This event most generally sells out so I would be inclined to believe it will be gone again rather quickly.  Go!  Go NOW and register and order!  SERIOUSLY! :)

***********************************************************************************

WOW!  I'm impressed!!!!  So, many of you saw my post about the amazing chicken deal.  Well, I picked my chicken up yesterday and wanted to show you what I got so that if this event comes to your town, or again comes to the valley that you all can get in on it! :)  TOTALLY impressed!  WOW!  I do know that this company also has "ground beef" events, and FOR SURE, if they offer this in the Phoenix area, I'm participating. 

A few weeks ago, I found out about this chicken event.  Basically, this company offers AMAZING product for an AMAZING price.  This chicken is hormone and injection free.  This event was for boneless, skinless chicken breasts in 40 pound boxes for just $1.49/lb.  WOW!!!  This is stuff I normally used to by at like Sprouts because they offer the chicken with no fillers, it's healthier, better for you, etc.  You also pay an arm and a leg for the stuff at Sprouts!  Not here.  I was so excited. 

I went to the website, registered, and then bought my box ahead for the event day.  This event SOLD OUT, so if it comes around again, you need to be QUICK about ordering! 

My friend and I went yesterday to pick it up!  It was the smoothest, most slick adventure to getting chicken.  Felt a tiny bit guilty as a matter of fact! :)  So, we brought our printed "receipts" with us.  They had a big refrigerated semi trailer in the parking lot of a church in Gilbert.  They had orange cones everywhere and a definite flow of traffic set up!  There was ONE entrance, and about half way around the "U" there was someone checking your name off the list and then they'd put laminated "numbers" of how many boxes you were picking up under your wipers and then you'd keep driving forward and on either side of the trailer you pulled up.  Then there were about 8 people there taking the boxes off the truck (already premeasured and pre packeaged) and putting them into your trunk and off you went!  That was it!  SO EASY!

Got home and immediately started prepping my chicken by taking the yucky stuff off (I'm pretty picky about this! :)) and then putting them into a variety of Ziploc bags.  I decided to bag mine very specifically so that in the future it's super easy for me to make my meals.  I had some in stir fry fashion where I cut my chicken into strips, I put 3 breasts in several bags for when I make soups or taco meat, and then I put 4-5 breasts into a few bags for when I make Christy's Chicken or dishes like Chicken Fillets over Rice, etc.  I LOVE IT!  I am going to show pictures below for you to see.  Wish so bad now that I would've taken pictures of the pick up location.  Maybe next time!  I got a total of about 42-44 single breasts.

I HIGHLY RECOMMEND THIS IF IT COMES AGAIN TO PHOENIX OR COMES TO YOUR AREA!  Go to the website here and check for events:  http://www.zayconfoods.com/refer/zf10027.  If you continue following my blog or my JoJo's NumNums facebook page, I will announce again when I hear they will be here.  It's my understanding they come about 2 times a year.

Here is how the chicken comes. The breasts are together.

 Here you can see the box that it came in.

Here's all my chicken prepped several different ways!

Friday, September 30, 2011

Starbucks Salted Caramel Mocha

You have no idea how happy this makes my heart!  With the help of my dearest friend (who used to work at Starbucks), we figured out the combination and I'm telling ya'll, if I were blindfolded and had one cup of Starbucks and one cup of one made from home, I COULD TELL NO DIFFERENCE!

So, here it is!

Now, before I start, sorry for the poor photography.  Drinks I've found are awfully difficult to take pictures of!

 Again, sorry for the not so great picture! :(
This doesn't do it justice! :)


For the homemade mocha additive:
1 can evaporated milk
3/4 c dry cocoa
3/4 c sugar

In a small bowl, mix the sugar and cocoa until there are no more lumps.  Slowly add the can of evaporated milk using a whisk and whisk until everything is completely combined.  Refrigerate any leftovers (which you'll have tons unless you're feeding an army!)

Homemade Mocha!! MMMM!

Salted Caramel Mocha (Hot or Iced)
2 shots espresso
4 pumps Toffee Nut Syrup (FROM STARBUCKS)
2 T mocha
1 - 1 1/2 c milk (steamed for hot version)
Caramel Syrup (ice cream topping)
Coarse Sea Salt

Mix espresso, syrup and mocha until it is blended.  Add the milk and stir.  Top with whipped cream, some caramel syrup and coarse sea salt!

You'll notice the chocolatey look here.

NOTE:  Starbucks sells the Toffee Nut syrup to any customer for $7.95/bottle.  $1 for the pump (this is important cause it's calibrated specifically for the drinks).  This will last you MANY drinks.  You pay over $5 for ONE drink, so think about how much you are saving by just making them at home!  

Monday, September 26, 2011

Shepard's Pie

My dear hubby, though not a stitch of Irish in him, LOVES him some SHEPARD'S PIE!!!!  This is a very common "meat and potato" recipe at our house!  My kids too inhale this stuff, and it's SO NICE cause it's "all in one" so I don't have to cook any veggie sides, etc!  What could get better than that!? :)

So, here it is! :)


1 lb ground beef
1/4 c Worchestershire Sauce
1 packet Brown Gravy Mix
2 T flour
1 c water
1-2 bags frozen mixed vegetables
2.5 lb potatoes (red are the best, but russet will do)
1 stick butter
1 c Cheddar Cheese, shredded

In a frying pan, brown ground beef in the Worchestershire Sauce.  When the meat is done cooking, add the dry packet of Brown Gravy & flour and coat the meat.  Add 1 c water.  Simmer a few minutes until the gravy has thickened.  Mix the frozen vegetables (don't need to heat), and hamburger mix together in a 9x13 pan.  Peel and boil potatoes and mash either by hand or in a food processor or in a Kitchen Aid with a stick of butter.  Layer potatoes on top of the meat/veggie mix and top then with cheese.  Bake @ 350 for 40 minutes.

Note:  I DO make a double batch and freeze this dish just before the bake time.  On dinner day, I just set on the counter in the morning and bake as instructed above.

Thursday, September 15, 2011

Chewy Soft Pretzels

 Roll about 20" wide.

 Swing right side to the middle.

 Swing left side and cross over the right side.

 Cornstarch bath in HOT water and cornstarch.

Bake & top with melted butter and whatever toppings you like.

4 t yeast
1 t sugar
1 1/4 c warm water
4 c flour
1/2 c sugar
1 1/2 t salt
1 T olive oil
1/2 c baking soda
4 c hot water
1/4 c kosher salt, for topping
 
 
Dissolve yeast and 1 t sugar in warm water. Let stand until it foams and bubbles, about 10 minutes. In your bread machine bowl, put in 1/2 c sugar, salt, olive oil.  Measure 4 c flour on top of the moist mixture and start the dough cycle.  When the timer goes off, divide the dough into 12 equal parts.  Roll each out like a snake about 20 or so inches wide.  Form into a pretzel.  Dip into baking soda warm water (I mix soda and water and JUST bring to a barely simmer and turn the burner off) for about 30 seconds and place on a parchment paper lined cookie sheet.  Bake in a preheated oven of 400 degrees for 8 minutes, until browned.

Monday, August 22, 2011

Cornbread

So, not so long ago (maybe a year), Benjamin took me on a nice date to a high class restaraunt here in Phoenix that rotates around the top of this tower while you dine.  AMAZING!  Not to mention the AMAZING waitress we had!  She was just a doll!  Worked hard and sought out ways to make our night more pleasant.  She just went the extra mile!  Such a neat place!  Anyway, while dining in this place, they served us Cornbread.  Not a huge fan of Cornbread myself, I offered my hubby my piece, but he MADE me try a bite at least.  Needless to say, he never got my piece! :)  It was AMAZING!  And I ate every last bite! :)  He teasingly asked our waitress if he could have just one more piece of cornbread and she obliged, and with it, she brought out a card that had the printed recipe!!!  The actual recipe this restaraunt uses!  Oh, were we happy! :)  I've made it a few times since we ate there and every time it's the same, incredibly addicting!  So, I'm sharing it now with you!


1 lb (4 sticks) butter
2 c sugar
2 c cornmeal
8 eggs
28 ounces cream corn (see recipe below)
3 c flour
2 T baking powder
2 T salt
6 oz cheddar cheese

Cream the butter, sugar and cornmeal. Add eggs one at a time -- mix until incorporated. Add cream corn (see recipe below) and mix until incorporated. Add flour, baking powder and salt. Mix until incorporated. Add cheese, mix. Grease pans.  Preheat oven to 300. Bake about 1 hr until a toothpick inserted comes out clean. 


This recipe yeilds either 1 - 9x13; or 2 - 9x9; or 4 - large loaf pans. 

Note:  This can also be frozen UNBAKED, and baked the day of serving.  See pictures. 


Cream Corn

2 (10 ounce) packages frozen corn kernels, thawed
1 c heavy cream
1 t salt
2 T sugar
1/4 t pepper
2 Tbutter
1 c whole milk
2 T flour
1/4 c freshly grated Parmesan cheese

In a skillet over medium heat, combine the corn, cream, salt, sugar, pepper and butter. Whisk together the milk and flour, and stir into the corn mixture. Cook stirring over medium heat until the mixture is thickened, and corn is cooked through. Remove from heat, and stir in the Parmesan cheese until melted. Serve hot or use for recipe.

Thursday, July 7, 2011

Crunchy Romaine Toss Salad

 The yummy homemade dressing!!!

 The crunchies you'll put on top!!!

 Fresh sliced strawberries!

The Salad!


Lettuce Salad:
1 head Romaine lettuce, washed and cut
1 lb strawberries, washed, hulled and sliced
3 green onions
2 heads of brocoli

Crunchies:

2 pkg Ramen noodles, crushed
1 c slivered almonds
1/2 stick butter

Dressing:

1 c vegatable oil
1/2 c red wine vinegar
1 c sugar
1 T soy sauce

Cut, wash and prepare lettuce and put in a large bowl.  Wash and cut brocoli into small bite size pieces.  Cut green onion and put over lettuce with the brocoli.  In a small saucepan, melt butter.  Add DRY broken up Ramen Noodles and almonds and saute until they are golden.  I would suggest a medium heat and watch closely stirring frequently.  These will burn quickly if they are not watched.  In another container (I use a Ziploc Twist and Lock) and mix together oil, red wine vinegar, sugar and soy sauce.  Cover with lid and shake until everything is well combined.  When ready to eat, serve lettuce bowl part onto your plate, top with strawberries, crunchies and the amount of dressing you desire!  Eat!  This is so light and so refreshing!  You will want seconds!  I DO NOT recommend putting EVERYTHING all together in one big bowl as once it's all combined it all must be eaten!  If you serve separately, you can use as leftovers!

Wednesday, June 1, 2011

Paul Specials

This recipe is one I will always remember from way back!  My mom used to work as a waitress at a small restaraunt where she grew up where these sandwiches were served!  Simple, yet there's something I can't explain about how good they are! :)  They just are! :)


1 package hamburger buns
1 lb pork sausage (I use my breakfast sausage recipe.), browned and drained
1 can pizza sauce
1 lb shredded Mozzarella Cheese

Toast your buns on broil in the oven watching very carefully!  They toast quickly when on broil.  Take them out of the oven and put a heap of cheese on the top bun and a spoonful of pizza sauce on the bottom bun.  Add a spoonful of your browned pork sausage on top of the sauce.  Throw back into your oven at 350 and bake until your cheese is melted.  Usually about 15 minutes.  If you like your cheese a little more crispy put it on broil at the very end for about a minute until it is golden!  This is a great meal for a larger group party.

Thursday, May 19, 2011

Cherry Scones

I'm back!  So sorry for the LOOOOONG extended time between today and my last post.  Ahem.  I will try to do better!  The funny thing is that I have tons of recipes typed in posts ready to share, but haven't uploaded all my pictures yet, so they aren't getting posted too quickly!  Hard to find the time right now to do that!  Things get busier the older my kids get! :)  I thought it was the other way around. :)  Boy am I wrong!

So, I just got back from a visit to meet my new NEPHEW, Nolan Whitson, a few weeks ago!  Oh, and I got to see my sister and BIL.  :)  That was great too! :)  I'm smitten with that sweet baby boy, but that's not why you all are watching my blog for new recipes, so I guess this proud auntie will move along! :) 

Anyway, while I was out there, the Royal Wedding took place and Nolan just so happened to wake up at 3AM for a feeding, so what perfect timing to get up and watch the Royal Wedding!  Won't ever forget this morning.  My sister and I watched as we drank hot breves and ate................ready for it............these very Cherry Scones!  OH MY!  Let's just say I felt rather "royal" while eating and watching, so here's the recipe! :)  My sister is an AMAZING cook herself, and gave me a great stack of new recipes for me to try and she's given me permission to post them as I see fit!  She briefly mentioned she wanted to "featured" on the blog, so here's to you, sweet sister!!!  Love you!


 Dough just out of the mixer!

Roll the dough out on flour surface to 1/2" or so thick. (mine here was too thin! :()

 Cut into 8 triangles!

 Bake!  I put mine in for 12 minutes and these are too done! :( 
Would've taken out at 10 minutes had I been watching! :)


2 c flour
1/4 c sugar
1 T baking powder
1/2 t salt
6 T cold unsalted butter cut into 1/2" slices
1/2 c dried cherries
1/4 c sliced almonds
2 eggs
1/2 c whole milk
1/2 t almond extract


Preheat oven to 425. Mix together flour, sugar, baking powder & salt. Cut in the butter until mix resembles coarse meal. Mix in cherries & almonds.

In a separate bowl combine eggs, almond extract and milk. Stir into the flour mixture just until moist. (If sticky, add a little more flour.) Turn dough and make into a ball. Flatten to 1/2" thick. Cut into 8 wedges.

Brush tops w/ milk and sprinkle with sugar. Bake 15 min.

NOTE:  These freeze VERY well, just pull them out frozen and place on your cookie sheet as little or as many as you need and bake.  May need a few extra minutes, but not much!  The morning of the royal wedding we pulled them from the freezer and they were baked a very short time later!

Thursday, April 14, 2011

Apple Salad

Growing up, my family would travel about one weekend a month to my grandparents' farm near Ankeny, Iowa!  OH THE MEMORIES!  Our children are now buried about a mile from there, so it holds even more meaning!  Anyway, my granny made this apple salad many a time growing up, my mom also made this many a time growing up, but I can remember this being one of my grandpa's favorite salads!  Mine too!  The combination is going to seem "off" but I assure you it's a great salad with great flavors.  I do, however, caution you to make it shortly before you will serve, refrigerate until you do, and discard the leftovers.  It's a salad that needs to be eaten right away!


4 apples (I prefer Honeycrisp, but do NOT use Granny Smith)
2 bananas
1 1/2 c mini marshmallows
1 c Miracle Whip
4 T sugar (give or take)

Cube all the apples into a mixing bowl.  Slice all the bananas into that same bowl.  Put marshmallows on top.  In a small bowl, mix together the miracle whip and sugar until blended.  You want to make sure the "tang" in Miracle Whip is almost gone, a little is alright.  Once this is stirred, pour over the top of your cut fruit and marshmallows and stir until everything is well combined.  CHILL! 

Wednesday, April 13, 2011

GROUND BEEF 93/7 ZAYCON EVENT

IT'S HERE!!!!!!!!  GO NOW!  Ground Beef Event is here in Mesa (AM) and Chandler (PM), Tuesday, April 26!!!!! 

40 lbs of ground beef for $2.89/lb.  Go to this link:

https://www.zayconfoods.com/refer/zf10027

and sign up for your account, and order!  Here again, no telling how QUICKLY this event will sell out!!!!  Although I've not done their ground beef event, I've been SUPER EXCITED to try it as I've been SO PLEASED with their chicken events!  I don't think I'll be disappointed!

Here's the link again!  Hurry fast before it sells out!

https://www.zayconfoods.com/refer/zf10027

Sunday, April 3, 2011

Monkey Bread

Monkey Bread!  Reminds me of my childhood sometimes Sunday mornings when our good family friends would make it adn serve it fresh out of their oven!  Mmmmm!  Unbelievably yummy! :)  I have to be honest, having watched it be made, I hesitated making it as it looked like so much work.  I've simplified the process and had it in the oven in less than 30 minutes! 

Biscuits, here's so you know what to look for! :)

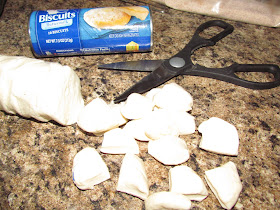
Cut one tube at a time.  Quarter each biscuit.

Once one tube is cut, throw them all into your sugar & cinnamon!

Layering them in the bundt pan!


Microwaving butter, brown sugar & KARO!

Pour over uncooked bread.

Bake!

Here is your end product!


4 Pillsbury tubes of biscuits
1 c sugar
1 T cinnamon
1 stick butter
1/2 c DARK brown sugar
2 T KARO syrup

In a gallon ziploc bag, combine the sugar and cinnamon.  One tube at a time, cube each biscuit into fours.  Throw that quartered tube into the sugar mix, seal bag and shake coating each piece individually.  Put sugared pieces into a greased bundt pan.  Do this with each of the other three tubes of biscuits until all pieces are covered in sugar and layered evenly in your bundt pan.  In a microwave safe bowl, combine butter, brown sugar and Karo.  Microwave for 60-90 seconds until all ingredients can easily be incorporated.  Pour this over the top of your biscuits and put in the oven.  Bake @ 400 for 20-25 minutes.  Remove from the oven.  Take a large plate or platter and immediately flip the monkey bread out.  The caramel sticky layer will drizzle down over the sides.  Enjoy!

Thursday, March 3, 2011

BACON!!!

Okay, so who is with me!?  I HATE frying bacon!  I don't use that word very often, but on very few occassions I use that word quite honestly!  Frying bacon has NEVER been a fun thing for me.  I can't stand the MESS it makes when fried up in a pan on the stove, and how it cooks so unevenly in the pan.  Keeping the temperature a right level in the frying pan is something I never did learn the science of.  Microwave was the next best thing, but even then it was hot to handle the dish in which you had to remove from the microwave, the MESS it created in my microwave from the grease splattering as it popped even under the paper towel, draining the hot grease, etc.  You get my point!  This task in my kitchen got so frustrating I completely skipped making any bacon at all!  I boycotted it with all I had! :) 

Fast forward, my dear hubby LOVES bacon!  I couldn't continue to be a cruel wife, so when I figured out how to FINALLY cook bacon, it's a REGULAR thing in our home now! :)  And everyone is happy!  My kids will eat and eat and eat and EAT bacon now! :)

Here's the trick! Your problems have now been solved and you won't BELIEVE what a difference this makes! Take a cookie sheet jelly roll WITH SIDES. Put a piece of foil on the bottom of that cookie sheet. Take your pound of bacon and lay each piece flat one right next to each other. They can be touching just a little. Put your pan in a preheated oven at 400 degrees. Bake for about 30 minutes, less or more depending upon your bacon crispiness likings. Take out of the oven, and let sit for a few minutes. I then take a plate and put paper towels on it and take the bacon and let it "degrease." Flipping on each side.


Not only does your bacon LOOK appealing with not such an ugly deformation, but it's PERFECT for things like bacon to top on your hamburger to make your bacon cheesebureger OR bacon for your BLT's in the summer!  OH MY! 

Alright, so there you have it! :)  THAT EASY & THAT SIMPLE!  Now...........off to eat some bacon in  my fresh egg omelet from our chickens! :)  Top of the day to you! ;)

Wednesday, March 2, 2011

Asiago Cheese Bagels

Any Panera lovers!? :)  I used to be until I moved out to the southwest where they have NO PANERA!!!!!  I've come up with my own solution when I get that REALLY BAD CRAVING (which it's been most recent cause a friend of mine came out here to stay a few months and facebooked that she missed Panera, and was SHOCKED there wasn't one here. :))  You have already seen a few other posts about my Panera addiction and this is just another! :)  Enjoy!


Balls of dough before hole is poked in the center!

Holes have been made.  This is a tedious process with LOTS of stretching needed!


 Water almost ready to start boiling the bagels! You'll notice the holes in the center are almost closed!

 Boiling!

Topped with cheese after they've been boiled!

 Baked!

PERFECT MATCH!  Asiago Cheese bagel WARM & a Breve!
It can't get much better than this! :)


4 c flour
2 pkgs yeast
1 1/2 c warm water
3 Tsugar
1 Tsalt
1 T sugar
1 c shredded Asiago Cheese

Put yeast into your warm water and stir.  Let sit for a few minutes, it will start to foam.  Meanwhile, mix together your flour, sugar (3T) and salt.  Pour yeast mixture into your bowl and mix until everything is well blended and a dough ball forms.  I use my Kitchen Aid with the dough hook, this is THE BEST way to do it if you have it.  Once you've mixed the dough and nothing is sticking to the sides (add little bits of flour if still sticking to the sides of bowl until it doesn't any longer), drop it onto the counter and hand knead for another 5 or so minutes.  Then let rest on the counter with a damp dish towel over the top.  Let it sit for about 20 minutes.  Take and divide the dough into 8 even sections.  Once that is divided take each ball of dough and knead so that the creases are in the bottom of the bagel when put onto a GREASED pan for their second raising.  Once all have been formed into smooth circles, stick your finger into the center of each piece of dough and stretch as much as possible.  This dough is stiff and will spring back, just keep restretching them.  Put the dish towel over the top of the pan and put into your oven with JUST THE LIGHT on.  Let them raise for another hour like that.  Remove and preheat your oven to 375.  While your oven is preheating, boil about a gallon of water with 1T sugar.  Boil bagels 7 minutes, flipping them ONCE at about 3 1/2 minutes.  Remove and let drain on a paper towel.  It will stick to the paper towel, but will also remove fairly easy.  I let them drain for only about one minute.  Top with shredded Asiago Cheese.  Bake in the preheated oven for about 30-35 minutes.  Just WATCH CAREFULLY as every oven will vary.  Mine were definitely done at 30 minutes.  I don't care for mine super dark.  They are best eaten right out of the oven.  Just my own opinion! :)  Otherwise when through, make sure to put any leftovers (if there are any) in a Ziploc to keep them moist.  Toast the next morning and top with cream cheese! :)